Formatting your text
You can use Markdown (a simple plain text format) to highlight and layout your text.
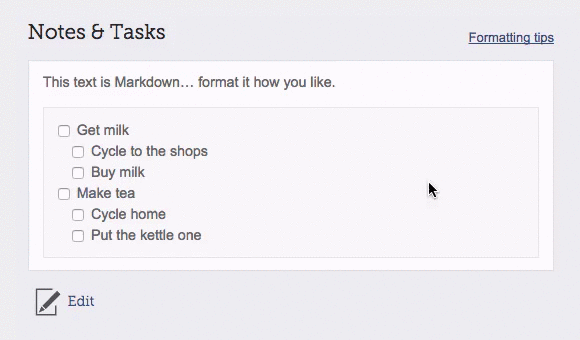
Planner understands Markdown on cards, in the Notes & Tasks area beneath each card, and in discussions.
Adding emphasis
Add emphasis with **bold** or *italics*.
Lists
Bulleted lists can be written by starting each bullet on a new line, with a leading hyphen.
- Bullets
- Are easy
  - And can be nested
  - By adding leading spaces
You can also create numbered lists:
1. Firstly..
2. Secondly...
  - You can use nested bullets here too
3. Thirdly...
Tasks
In a card's Notes & Tasks you can use lists as tasks. Add some square brackets at the beginning of each bullet, and Planner will replace it with a checkbox that you can click to mark the task as complete. An "x" character is used to indicate that the task is complete.
- [x] Our first task
- [x] The second task
- [ ] Large tasks can be broken down
  - [x] into sub tasks
  - [ ] by indenting your bullets
Click the checkboxes to mark tasks as complete.
You can read more about tasks on Planner's blog.
Linking to web pages
If you paste URLs in your text, Planner will convert them into links for you.
http://www.google.com
If you'd like to use links within your copy, you can create them like this:
Here's a [link to Google](http://www.google.com).
If you're writing a lot of links, there's an alternative style that you might find useful:
Here's a [link to Google][goog], and a link to [Bing][].

[goog]: http://www.google.com
[Bing]: http://www.bing.com
Rather than putting the URL in parentheses, a short "reference" is added in square brackets (e.g. "goog"). If you leave the reference out entirely, Markdown uses the text of the link ("Bing" in this example).
Headings
# An <h1> heading

A paragraph

## An <h2> tag

Another paragraph

### An <h3> tag

You get the idea...
Formatting code
If you indent a block of text by 4 spaces, it will be rendered in a fixed width font and line breaks will be observed. This is the standard way of marking up source code in Markdown.
Planner also supports a popular alternative, known as "fenced code blocks". Rather than indenting a block by four spaces you can insert three backticks above and below your code.
```
print 'Hello world'
```
If you give Planner a hint about the programming language you're using, it will be able to add syntax highlighting for you.
``` javascript
console.log("Hello again!");
```
Syntax highlighting isn't implemented yet, but if you start adding language hints now your code snippets will be highlighted as soon as Planner supports it.
Making links between cards
You can create links between cards by mentioning them in the text of your Story, or the Notes & Tasks. Refer to another card by prefixing its number with either a "#" character or the word "card" (e.g. "#42" or "card 42").
To give you an example, you could write either:
- "Split from #203"
- "Depends on card 42"

Associated cards are listed at the bottom of each card's page.
Tables
If you'd like to display data in a table, you can use the following syntax:
Fruit  | Colour
------ | ------
Apple  | Green
Banana | Yellow
Headings are separated from the main content by the row of hyphens.
Planner will convert your table into HTML when it displays it on the web site.
Aligning your columns
By default the contents of each cell in the table will be left aligned. If you'd like to right-align a column you can add a colon to the header separator:
Fruit  | Colour
------ | -----:
Apple  | Green
Banana | Yellow
To centre-align a column add two colons, one at each end of the header separator:
Fruit  | Colour
------ | :----:
Apple  | Green
Banana | Yellow
For more details on formatting tables, see the PHP-Markdown documentation.